HOMEMADE HUMMUS & VARIATIONS: YOUR #1 GUIDE TO CREAMY PERFECTION! (And Why You’ll Love It Too!)
Let’s talk Homemade Hummus & Variations! Okay, let’s be real. Store-bought hummus is… fine. It gets the job done in a pinch. But have you ever had truly homemade? The kind that’s so unbelievably creamy, so bursting with fresh, vibrant flavor that it makes your taste buds sing? Yeah, that’s what we’re making today!
My hummus journey started, embarrassingly enough, with a major kitchen fail. I remember trying to whip up a batch for a potluck, thinking, “How hard can it be?” Turns out, pretty hard if you end up with a grainy, pasty mess. It was… not my finest culinary moment. But, being the determined cook I am (and fueled by my love for all things delicious, especially healthy snacking!), I dove headfirst into research. I experimented with different chickpea preparations, tahini types, lemon juice ratios – you name it. And slowly, beautifully, magically… I cracked the code!
Now, homemade hummus is a staple in my kitchen. It’s the go-to for healthy snacking, quick lunches, and even elegant appetizers. And the best part? Once you master the basic recipe, the flavor possibilities are endless with creative variations! That’s why today, I’m sharing not just my foolproof recipe for incredibly creamy hummus, but also a bunch of fun and easy flavor twists to keep things exciting. Trust me, once you taste homemade, you’ll never go back to the tub. Ready to become a hummus pro? Let’s get started!

RECIPE OVERVIEW & KEY DETAILS FOR PERFECT Homemade Hummus & Variations
Before we dive into the creamy goodness of Homemade Hummus & Variations, let’s get you prepped! Here’s a quick rundown of what to expect when making your own dip from scratch:
- Prep Time: About 15 minutes – mostly just gathering ingredients and a little chopping!
- Cook Time: Zero minutes! Unless you’re using dried chickpeas, then you’ll need to factor in soaking and cooking time (but trust me, it’s worth it for the ultimate flavor!).
- Total Time: 15 minutes (plus soaking time, if using dried chickpeas). Seriously, that’s it for incredible homemade hummus!
- Yield: This recipe makes about 2 cups of hummus – perfect for sharing (or not!).
- Category: Appetizer, Dip, Snack – basically, anytime food! Perfect for showcasing your culinary skills.
- Cuisine: Middle Eastern & Mediterranean vibes – get ready to transport your tastebuds with authentic flavors!
- Calories (Estimate): Around 50-70 calories per 2 tablespoons. Of course, this can vary a bit depending on your exact ingredients and serving size, but it’s a wonderfully healthy and satisfying snack.
ESSENTIAL INGREDIENTS FOR AMAZING HUMMUS RECIPES
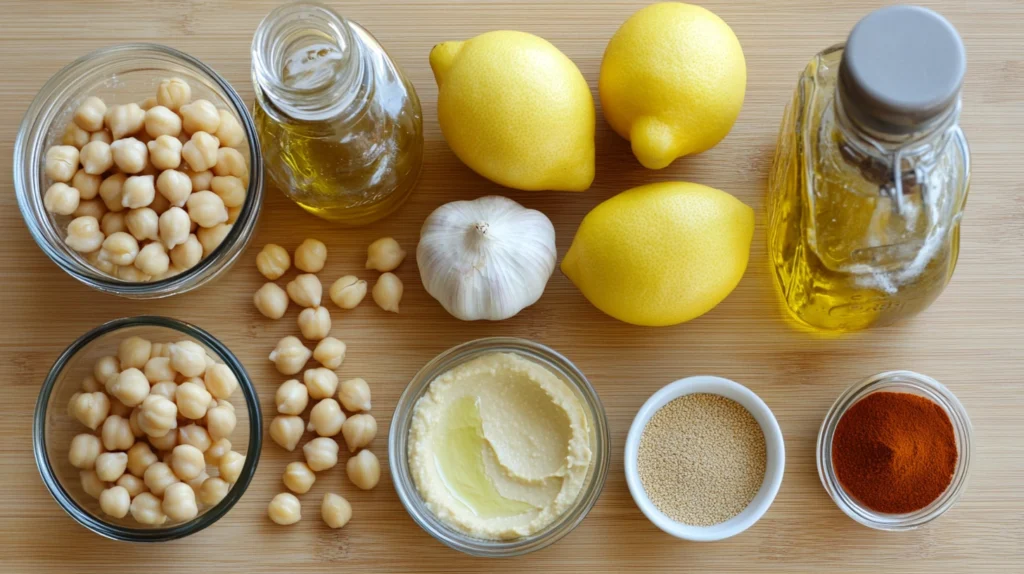
Let’s talk hummus building blocks! Here’s what you’ll need for that classic, creamy base and then we’ll explore some fun add-ins for even more exciting flavors:
PANTRY STAPLES
- Chickpeas (Garbanzo Beans): The star of the show! You can use canned chickpeas for convenience (just rinse and drain them well!) or, for the absolute best flavor and texture, start with dried chickpeas. If using dried, you’ll want to soak them overnight and then cook them until they are very tender – like, fall-apart tender. This makes a HUGE difference in creaminess.
- Tahini: This sesame seed paste is non-negotiable for authentic hummus flavor. Look for tahini that is smooth and pourable, not thick and dry. Good quality tahini is key!
- Olive Oil: Extra virgin olive oil, please! We’ll use it in the hummus and for drizzling on top. It adds richness and that signature flavor.
- Lemon Juice: Freshly squeezed lemon juice is a must for brightness and tang. Don’t skimp on the lemon!
- Garlic: A clove or two of fresh garlic adds that pungent kick. You can adjust the amount to your taste – some like it garlicky, some prefer it milder.
- Salt: Don’t forget the salt! It balances the flavors and really brings everything together. Start with a little and add more to taste.
- Cumin (Optional but Recommended): A pinch of ground cumin adds a lovely warm, earthy note that complements the other flavors beautifully.
FLAVOR ENHANCERS FOR CREAMY HUMMUS
These are the magic ingredients that take your hummus from “good” to “WOW!”
- Ice Water: Yep, ice water! This is the secret weapon for unbelievably creamy hummus. It helps to lighten the texture and create that dreamy smoothness.
- Baking Soda (If using Dried Chickpeas): A little baking soda added to the soaking water and cooking water for dried chickpeas helps to break down their skins and makes them extra tender, leading to super smooth hummus.
VARIATION INGREDIENTS (GET CREATIVE WITH HUMMUS!)
This is where the fun begins! For hummus variations, you might want to have on hand:
- Roasted Red Peppers: Jarred roasted red peppers (drained well) or freshly roasted peppers for a sweet and smoky twist.
- Roasted Garlic: For a mellow, sweet garlic flavor.
- Sun-dried Tomatoes: Oil-packed sun-dried tomatoes (drained) for a tangy, intense flavor.
- Jalapeños or Chili Garlic Sauce: For a spicy kick!
- Olives: Kalamata or other brined olives for a salty, briny flavor.
- Spinach or Roasted Vegetables (like beets or carrots): For added nutrients and vibrant color.
- Fresh Herbs: Parsley, cilantro, dill, mint – experiment and find your favorites!
- Spices: Smoked paprika, za’atar, sumac, everything bagel seasoning – the possibilities are endless!

MASTERING THE BASICS: 5 CORE STEPS TO PERFECT HUMMUS
Ready to make hummus magic and master Homemade Hummus & Variations? Here’s the basic process – it’s easier than you think to create amazing hummus!
- Prepare the Chickpeas (The Creaminess Key!): If using canned chickpeas, drain and rinse them thoroughly. Seriously, rinse them for a good minute under cold water. If using dried chickpeas, soak them overnight in plenty of water with a teaspoon of baking soda. The next day, drain and rinse them. Cook them in fresh water (again, with a pinch of baking soda) until they are extremely tender – about 1-2 hours, or even longer. They should practically fall apart when you squeeze them. This step is crucial for smooth hummus! Drain the cooked chickpeas, reserving some of the cooking liquid.
- Blend the Tahini and Lemon Juice First for Creamy Hummus: In your food processor, combine the tahini and lemon juice. Process for a minute or two until the mixture is thick and creamy and almost whipped-looking. This step is important because it “activates” the tahini and makes for a smoother, more flavorful hummus.
- Add Garlic and Spices for Flavorful Hummus: Add the garlic, salt, and cumin (if using) to the food processor. Process for another 30 seconds to a minute until the garlic is finely minced.
- Add Chickpeas and Ice Water (Secret Weapon!): Add about half of the cooked chickpeas to the food processor. With the motor running, slowly drizzle in ice water, a tablespoon at a time, until the hummus starts to come together and become creamy. Add the remaining chickpeas and continue to process, adding more ice water as needed, until you reach your desired consistency. You might use anywhere from ¼ cup to ½ cup of ice water, or even a bit more, depending on how creamy you like your hummus. Process for a good 2-3 minutes in total – the longer you blend, the smoother it gets!
- Taste and Adjust: Taste your hummus and adjust the seasonings as needed. You might want to add more lemon juice for tang, more salt, more garlic, or a bit more tahini for richness. Blend again to incorporate the adjustments.
PRO TIPS FOR THE BEST EVER HOMEMADE HUMMUS
Want to take your hummus to the next level? Here are a few pro tips for truly exceptional hummus:
- Peel the Chickpeas (Optional, But Extra Smooth Hummus): For ultra-smooth hummus, you can peel the skins off the cooked chickpeas before blending. It’s a bit tedious, but it does make a difference in texture. Just pinch each chickpea and the skin should slip right off. Honestly, for everyday hummus, I usually skip this step, but for special occasions or if you’re a texture fanatic, go for it!
- Warm Chickpeas (Another Texture Trick for Creamier Hummus): Some hummus aficionados swear by using warm chickpeas straight from the cooking pot (or microwaving canned chickpeas briefly) for an even creamier result.
- Good Quality Tahini Matters for Delicious Hummus: Cheap tahini can be bitter and grainy. Invest in a good quality tahini – it will make a noticeable difference in the flavor. Look for brands that are smooth and pourable.
- Don’t Be Shy with the Lemon Juice and Tahini: These are key flavor components in hummus. Don’t be afraid to add a generous amount of both to get that authentic, tangy, nutty flavor.
- Blend, Blend, Blend! Patience is key. Blend your hummus for a good few minutes to get it truly smooth and creamy. Stop and scrape down the sides of the food processor as needed.
COOKING TIPS FOR HUMMUS VARIATIONS (TROUBLESHOOTING INCLUDED!)
Ready to get adventurous with flavors and explore exciting Homemade Hummus Variations? Here are some popular variations and tips for making them perfect:
ROASTED RED PEPPER HUMMUS
- Method: Simply add about ½ cup of roasted red peppers (jarred or homemade, drained well) to the food processor along with the chickpeas and other ingredients.
- Tips: Roasting your own red peppers will give you the most intense flavor. You can roast them under the broiler or on the grill until the skins are blackened, then steam them in a bowl covered with plastic wrap to loosen the skins. Peel, seed, and chop them before adding to the hummus. For a smoky flavor boost, add a pinch of smoked paprika.
GARLIC HUMMUS
- Method: Increase the amount of garlic! Start with 2-3 cloves of garlic for a noticeable garlic flavor, and go up to 4-5 cloves if you’re a garlic lover creating Garlic Hummus.
- Tips: For a milder garlic flavor, you can roast the garlic cloves before adding them to the hummus. Roasted garlic is sweeter and less pungent than raw garlic. To roast garlic, cut off the top of a head of garlic, drizzle with olive oil, wrap in foil, and bake at 400°F (200°C) for about 40 minutes, or until soft and caramelized. Squeeze the roasted garlic cloves out of their skins before adding to your Garlic Hummus.
SUN-DRIED TOMATO HUMMUS
- Method: Add about ¼ cup of oil-packed sun-dried tomatoes (drained well) to the food processor when preparing your Sun-Dried Tomato Hummus Variation.
- Tips: Sun-dried tomatoes are intensely flavorful, so a little goes a long way in Sun-Dried Tomato Hummus. You can also add a tablespoon or two of the oil from the sun-dried tomato jar for extra flavor (and richness!). A sprinkle of dried oregano or basil complements the sun-dried tomato flavor nicely in this variation.
SPICY HUMMUS
- Method: Add a jalapeño pepper (seeded for less heat, or with seeds for more!), a drizzle of chili garlic sauce, or a pinch of red pepper flakes to the food processor when making Spicy Hummus.
- Tips: Start with a small amount of spice and add more to taste when creating Spicy Hummus Variations. You can always add more heat, but you can’t take it away! Taste as you go to achieve your perfect level of spice.
TROUBLESHOOTING GRAINY HUMMUS:
- Problem: Your Hummus is grainy, not smooth.
- Solution: Likely culprits are undercooked chickpeas, poor quality tahini, or not enough blending (or not enough ice water). If your hummus is grainy, try adding a tablespoon or two more of ice water and blending for longer. If that doesn’t work, you might need to strain the hummus through a fine-mesh sieve to remove the graininess. For future batches, make sure your chickpeas are cooked until very tender and use good quality tahini. Blending the tahini and lemon juice first also helps ensure smooth hummus.

SERVING SUGGESTIONS TO ENJOY YOUR HUMMUS & VARIATIONS
Homemade Hummus & Variations are delicious on their own, but here are some fun ways to serve them up and make them extra special:
- Classic Dip Platter: Serve hummus with warm pita bread wedges, fresh vegetables (carrots, cucumbers, bell peppers, celery, radishes), and olives for a healthy and satisfying appetizer or snack.
- Hummus and Veggie Wraps: Spread hummus on whole wheat tortillas or wraps and fill with your favorite veggies, sprouts, and maybe some feta cheese or grilled chicken for a quick and easy lunch.
- Hummus Toast: Upgrade your avocado toast with hummus toast! Spread hummus on toast and top with sliced tomatoes, cucumbers, avocado, everything bagel seasoning, or a drizzle of olive oil and a sprinkle of red pepper flakes for a tasty breakfast or snack.
- Hummus Bowls: Create vibrant and flavorful hummus bowls! Spread hummus in a bowl and top with roasted vegetables (like eggplant, zucchini, bell peppers), chickpeas, feta cheese, olives, fresh herbs, and a drizzle of olive oil. Serve with pita bread for dipping.
- Hummus as a Sauce: Use hummus as a creamy sauce for grilled meats, fish, or falafel. It adds moisture and tons of flavor!
- Garnish is Key! Don’t forget to garnish your hummus before serving! A drizzle of olive oil, a sprinkle of paprika, chopped fresh parsley, toasted pine nuts, or a few whole chickpeas all make your homemade hummus look extra inviting and delicious.
UNDERSTANDING THE NUTRITION OF HOMEMADE HUMMUS
Homemade Hummus is not only delicious but also packed with goodness! Here’s a quick peek at the nutritional benefits of incorporating it into your diet:
- Plant-Based Protein: Chickpeas are a great source of plant-based protein, which is essential for building and repairing tissues, and keeping you feeling full and satisfied.
- Healthy Fats: Tahini and olive oil provide healthy fats, including monounsaturated and polyunsaturated fats, which are good for heart health.
- Fiber Powerhouse: Hummus is loaded with fiber, thanks to chickpeas, which aids digestion, helps regulate blood sugar levels, and promotes satiety.
- Vitamins and Minerals: Hummus & Variations are a good source of various vitamins and minerals, including iron, folate, magnesium, and phosphorus.
- Vegan and Gluten-Free (Naturally!): Hummus is naturally vegan and gluten-free, making it a great option for those with dietary restrictions.
- Customizable Nutrition: You can boost the nutritional value even further by adding vegetables like roasted red peppers or spinach to your Hummus Variations.
Keep in mind that the exact nutritional content will vary slightly depending on the specific ingredients you use and your serving size. For detailed nutritional information, you can always consult reputable online nutritional databases like USDA FoodData Central.
STORAGE & REHEATING INSTRUCTIONS FOR HUMMUS LEFTOVERS
Good news! Homemade Hummus stores beautifully. Here’s how to keep your delicious hummus fresh:
STORING HUMMUS IN THE REFRIGERATOR
- Airtight Container: Store leftover hummus in an airtight container in the refrigerator.
- Olive Oil Layer (Optional): To help prevent the surface from drying out, you can drizzle a thin layer of olive oil over the top before sealing the container.
- How Long it Lasts: Homemade Hummus & Variations will typically last in the refrigerator for 3-4 days. Use your best judgment and discard if there are any signs of spoilage (off smell, mold, etc.).
FREEZING HUMMUS (FOR LONGER STORAGE)
- Freezer-Safe Container: Transfer hummus to a freezer-safe container or freezer bag. Leave a little headspace in the container as hummus expands slightly when frozen.
- Thawing: Thaw frozen hummus in the refrigerator overnight. The texture might change slightly after freezing and thawing – it might become a bit less smooth and a little more watery.
- Reviving Texture: To restore the creamy texture after thawing, give the hummus a good stir. You can also add a tablespoon or two of olive oil or lemon juice and stir or blend briefly to re-emulsify it and bring back the creaminess.
- How Long it Lasts Frozen: Hummus can be frozen for up to 2-3 months.
FREQUENTLY ASKED QUESTIONS (FAQS) ABOUT HOMEMADE HUMMUS
Got questions about Homemade Hummus & Variations? I’ve got answers!
CAN I USE CANNED CHICKPEAS OR ARE DRIED CHICKPEAS REALLY BETTER FOR HUMMUS?
Canned chickpeas are definitely convenient and will work in a pinch for hummus. However, for the absolute creamiest, most flavorful Homemade Hummus & Variations, starting with dried chickpeas is worth the extra effort. Soaking and cooking them yourself allows you to control the texture and flavor from the ground up (or should I say, chickpea up?). Plus, cooking them with baking soda really makes them extra tender and smooth, resulting in superior hummus. If you’re short on time, canned chickpeas are perfectly fine, just be sure to rinse them really well.
MY HUMMUS IS TOO THICK! HOW DO I THIN IT OUT?
Easy peasy! Just add a tablespoon or two of ice water at a time and blend until you reach your desired consistency. You can also use a little bit of the reserved chickpea cooking liquid (if you cooked your own chickpeas) or even a touch more lemon juice to thin out your hummus.
CAN I MAKE HUMMUS WITHOUT TAHINI?
Technically, yes, you can make a chickpea dip without tahini. But is it hummus? Debatable, especially when we’re talking about authentic Homemade Hummus. Tahini is a key ingredient that gives Homemade Hummus & Variations their signature nutty, slightly bitter flavor and creamy texture. Without it, you’ll have a chickpea dip, but it won’t quite be the real deal of Homemade Hummus. If you absolutely can’t use tahini (due to allergies or availability), you could try substituting with another nut or seed butter (like cashew butter or sunflower seed butter), but the flavor of your “hummus” will be different from true Homemade Hummus.
HOW LONG DOES HOMEMADE HUMMUS LAST?
Homemade Hummus & Variations will last for 3-4 days in the refrigerator when stored properly in an airtight container. You can also freeze it for longer storage (up to 2-3 months), although the texture may change slightly after thawing.
MORE DELICIOUS VEGAN INSPIRATION ON STIRDELISH
CONCLUSION: START YOUR DELICIOUS HUMMUS JOURNEY TODAY!
And there you have it! Everything you need to know to whip up the most amazing Homemade Hummus & Variations right in your own kitchen. From mastering the creamy base to experimenting with fun and flavorful twists, you’re now armed with the hummus knowledge to impress your friends, family, or just yourself (because let’s be honest, sometimes the best meals are the ones we make just for us!), and all thanks to the magic of Homemade Hummus & Variations.
Making hummus from scratch might seem a little intimidating at first, but trust me, once you try making Homemade Hummus & Variations, you’ll be hooked. The taste difference between homemade and store-bought is truly night and day when it comes to Homemade Hummus. Plus, it’s so satisfying to know exactly what’s going into your food – just simple, wholesome ingredients creating something incredibly delicious.
So, ditch the tubs and embrace the homemade hummus life! Grab those chickpeas, tahini, and lemons, and get blending to create your own Homemade Hummus & Variations. Your taste buds (and your healthy snack cravings) will thank you. Happy dipping into your fantastic Homemade Hummus & Variations! And hey, if you try out any of these variations or come up with your own amazing hummus creation, be sure to let me know in the comments below! I’d love to hear about your Homemade Hummus & Variations adventures!


